Since version 3.0 DirectoryPress Offer seamless user experience at Backend with ajax based operations, At the end of this short tutorial you will be able configure any content field easily. Watch Video or follow step by step guide below.
Step: 1 #
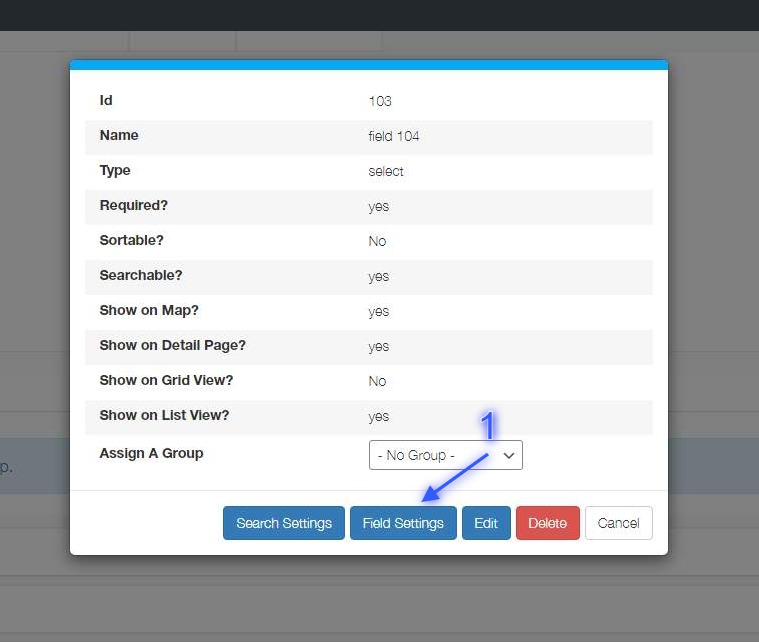
- Browse to DirectoryPress -> Fields (fig:1.1)
- Click Configure link for particular filed (fig:1.1)
Step: 3 #
Each field type has own configuration options, to understand particular field settings have looks at steps below according to field types.
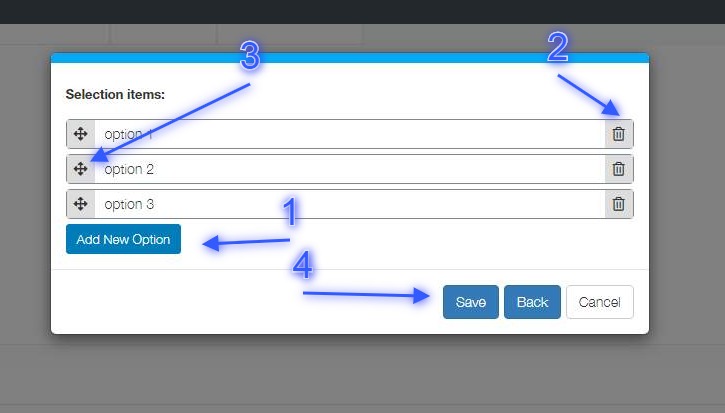
Field Type: SelectBox and Radio
All fields with * are required
- Add new option for this select field by clicking add new option button (Fig: 1.3)
- Click Trash Icon to delete particular option (Fig:1.3)
- Hold Arrow Icon and move option field up or down to change option order at frontend. (Fig: 1.3)
- Hit Save Button After desired changes then hit close button (Fig: 1.3)
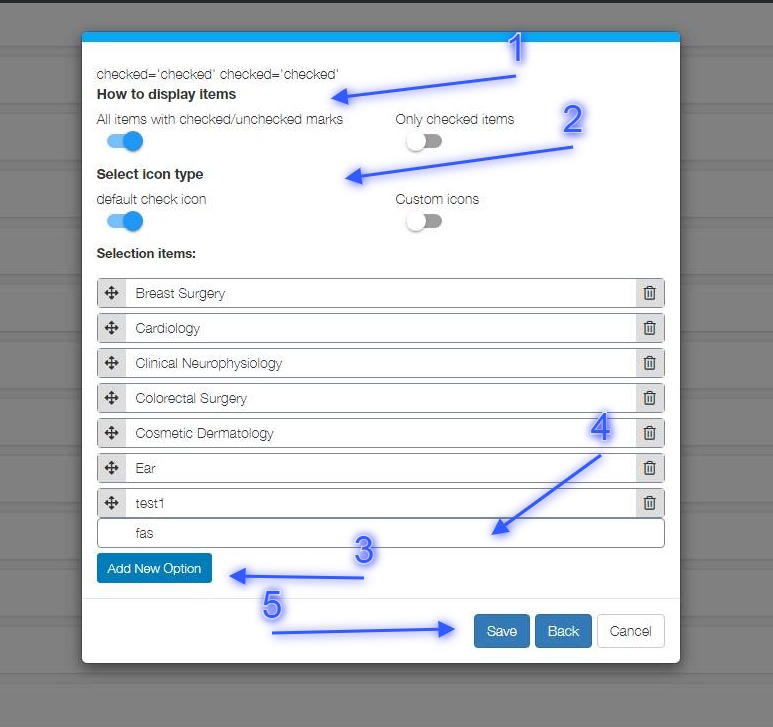
Field Type: CheckBox
All fields with * are required
- Select an option how to show filed option on single listing page, if selected all items, field would show all checked/unchecked option by user for particular listing (Fig: 1.4)
- Select icon type, if selected default, field would show checked and cross icons for this filed with each option at single listing page (Fig:1.4)
- Add new option for this checkbox field by clicking add new option button. (Fig: 1.4)
- Add icon class if custom icon type select for point number 2 (Fig: 1.4)
- Hit Save Button After desired changes then hit close button (Fig: 1.4)
- Click Trash Icon to delete particular option
- Hold Arrow Icon and move option field up or down to change option order at frontend.
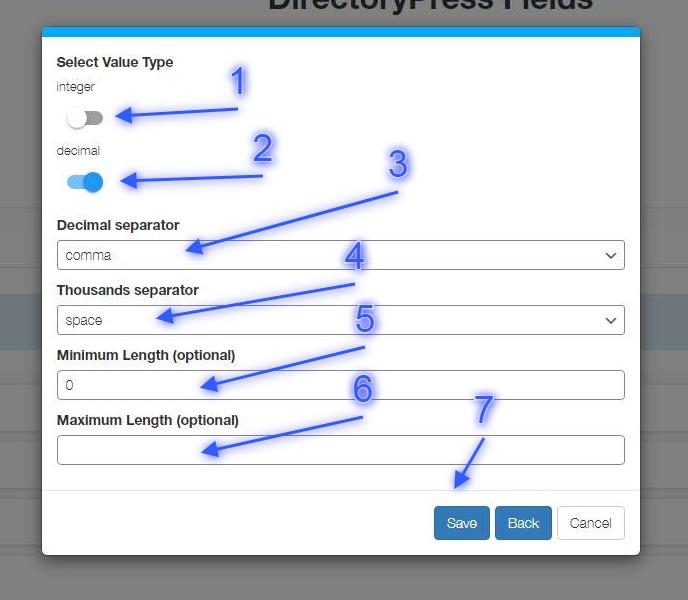
Field Type: Digit
All fields with * are required
- Select a Value type, Integer to show rounded value at frontend (Fig: 1.5)
- Select a Value type, decimal to show value up to 2 decimal points at frontend (Fig: 1.5)
- Select a decimal separator if decimal option selected above (Fig: 1.5)
- Select a thousand separator symbol (Fig: 1.5)
- Set minimum characters length for this field (Fig: 1.5)
- Set maximum characters length for this field (Fig: 1.5)
- Hit save button then close to exit.
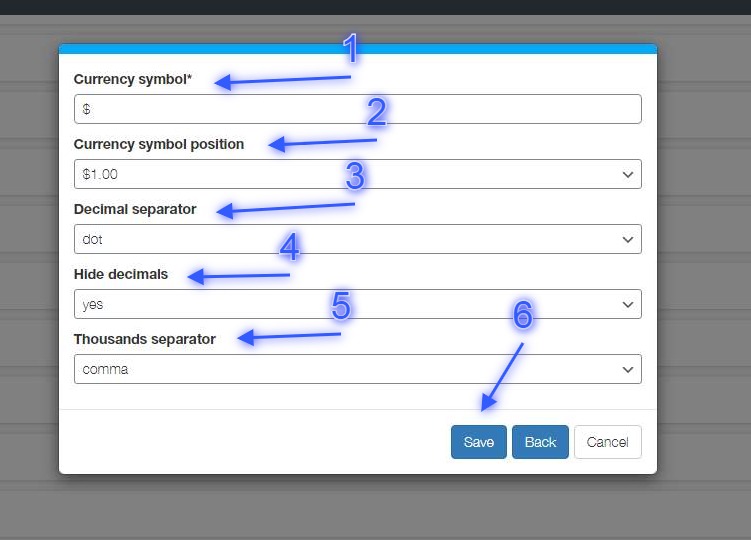
Field Type: Price | Price Field Type "Single"
All fields with * are required
- Select price field type “Single or Range”. (Fig: 1.6)
- Select Currency symbol for price field (Fig: 1.6)
- Select Symbol position to show before or after price value (Fig: 1.6)
- Select a decimal separator e.g a dot or comma (Fig: 1.6)
- if selected yes price value would be integer rather than decimal (Fig: 1.6)
- Select a thousand separator symbol e.g dot, space, or comma (Fig: 1.6)
- Turn on Input Options means a select box field will be available on the submit form with options. e.g Fixed, Negotiable, and On-Call. (Fig: 1.6)
- Turn on the Frontend Currency symbol if Turned on then a custom input symbol field will be available along with the price for the users. (Fig: 1.6)
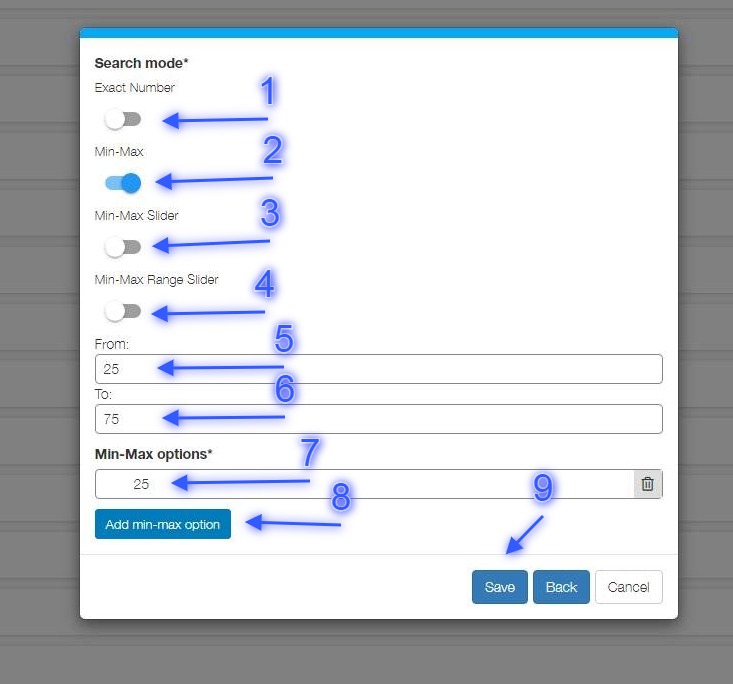
- Range options, Can work when you choose price field type as “Range”. on point 1.
- Add min-max option is for the price range field.
- Hit the save button then close to exit. (Fig: 1.6)
Field Type: Price | Price Field Type "Range"
- Select price field type “Range”. (Fig: 1.6.1)
- You can see a field where you can have your own text. e.g we entered a $ sign then call it a cheap. $ – Cheap (Fig: 1.6.1)
- Click on Add min-max Option button to add more fields like we did create 4 fields above. You can delete them by clicking on the recycle-bin icon (Fig: 1.6.1)
- Hit the save button and check the result on your front-end listing submission page. (Fig: 1.6.1)
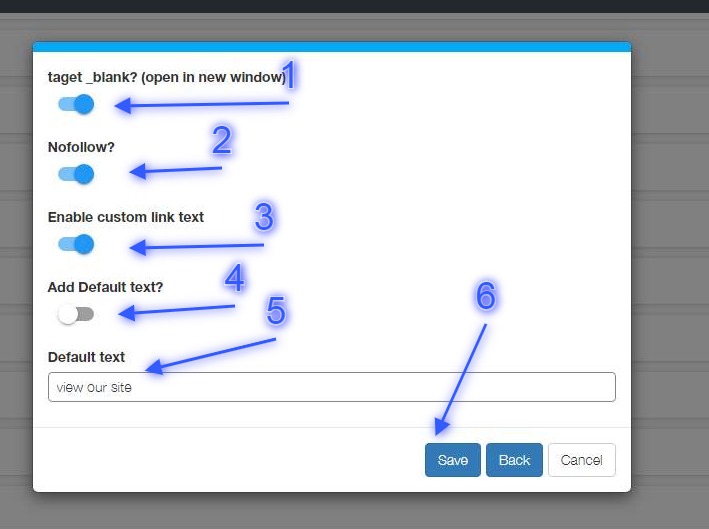
Field Type: Link
All fields with * are required
- Turn on to open link in new browser tab (Fig: 1.7)
- Turn on to add nofollow attribute(Fig: 1.7)
- If enabled, user will be able to add custom link text while listing submission (Fig: 1.7)
- Add default link text if custom text is disabled or not provided by user (Fig: 1.7)
- Add Defult Text if enabled above. (Fig: 1.7)
- Hit save button then close to exit. (Fig: 1.7)
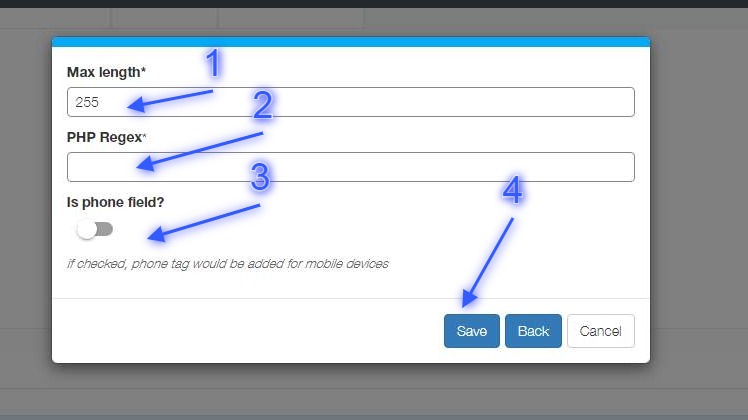
Field Type: Text Input
All fields with * are required
- Set Maximum characters length for input field at listing submission page (Fig: 1.8)
- You can set Regex for input validation(Fig: 1.8)
- If turned on, this input field would work as phone number field and a phone tag would be added for mobile devices.(Fig: 1.8)
- Hit save button then close to exit. (Fig: 1.8)
Field Type: Textarea
All fields with * are required
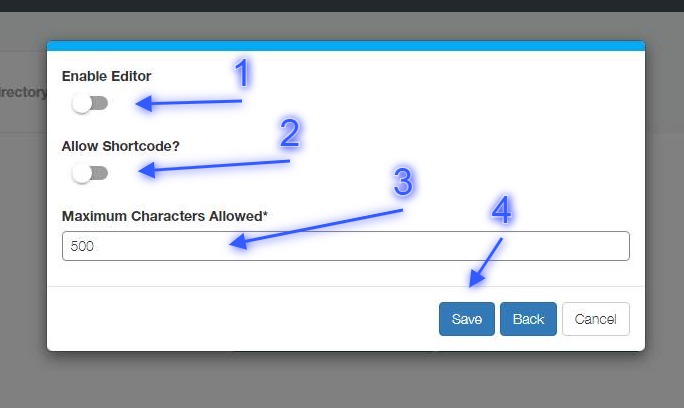
- If enabled, WordPress editor will be activated for this textarea field at submit listing page.(Fig: 1.9)
- If enabled, user will be able to add shortcode via this field at submit listing page.(Fig: 1.9)
- You can set Maximum characters length for this field(Fig: 1.8)
- Hit save button then close to exit. (Fig: 1.9)
Field Type: Attachment
All fields with * are required
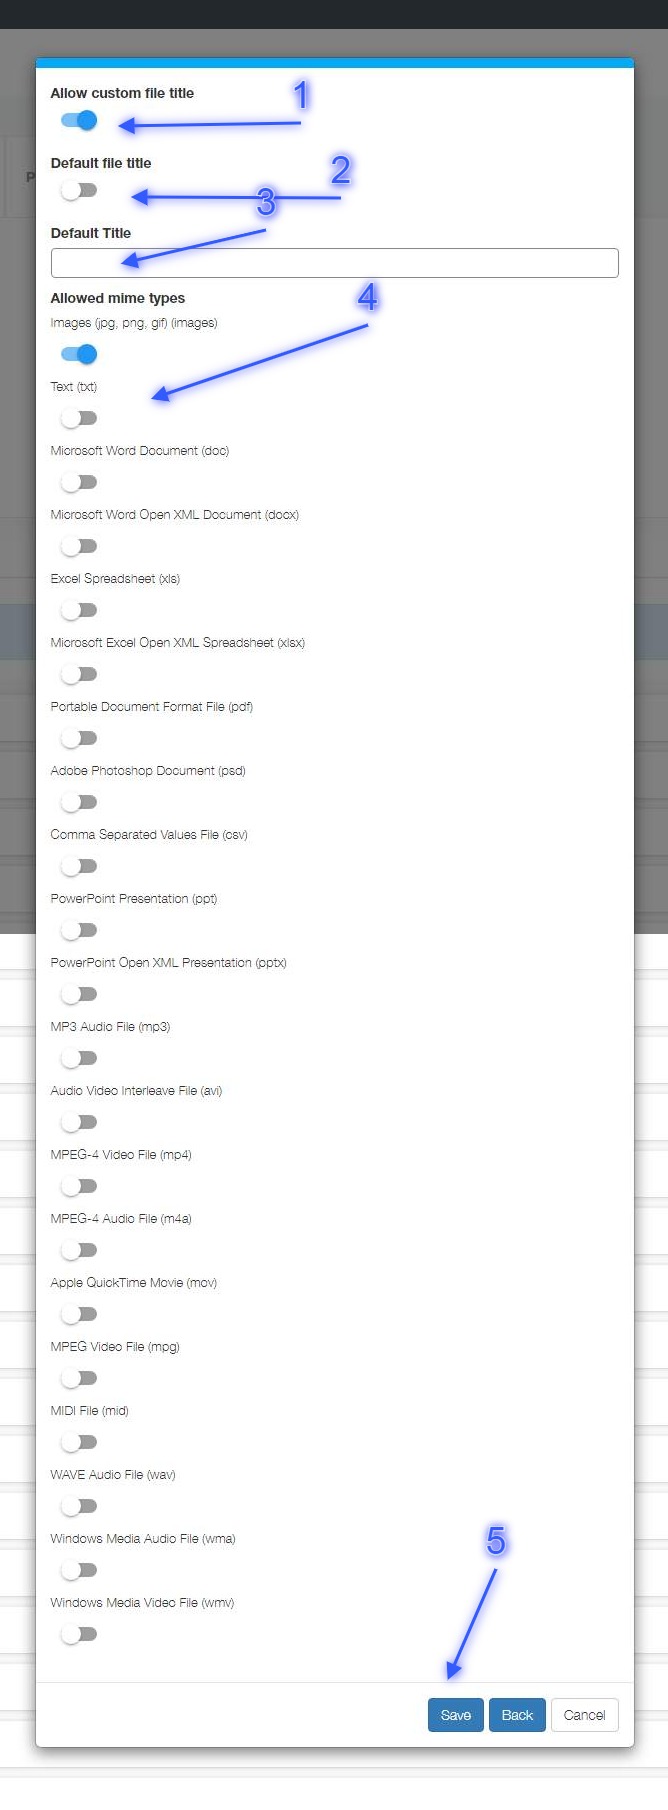
- If enabled, User will be able to add custom title for attachment file.(Fig: 1.10)
- If enabled, A default file title will be added if custom title is disabled or not provided by user(Fig: 1.10)
- Add default file title in case of activated default title above(Fig: 1.10)
- Turn on certain file types to allow upload for this attachment filed at submit listing page. (Fig: 1.10)
- Hit save button then close to exit. (Fig: 1.10)
Step: 4 #
All fields with * are required
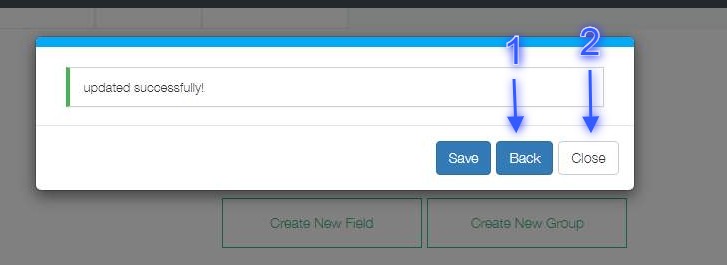
- After successful update, success message would appear (Fig: 1.1)
- If need further configuration e.g field settings or search settings click back button (Fig: 1.1)
- If no more changed required click close button (Fig: 1.1)


